Deploying Containerized application in EC2 with Reverse proxy.
How to run a Docker containers on EC2.
# What is Containerized application?
Application which runs in isolated runtime environment called container. This container will encapsulate the application along with its dependencies only, So that it can be consistent across different hosts.
The best example for containerizing an application is Docker.
- Let us deploy a containerized application consists of
frontend,backend,Redis,MongoDB. Our application flow should like this:
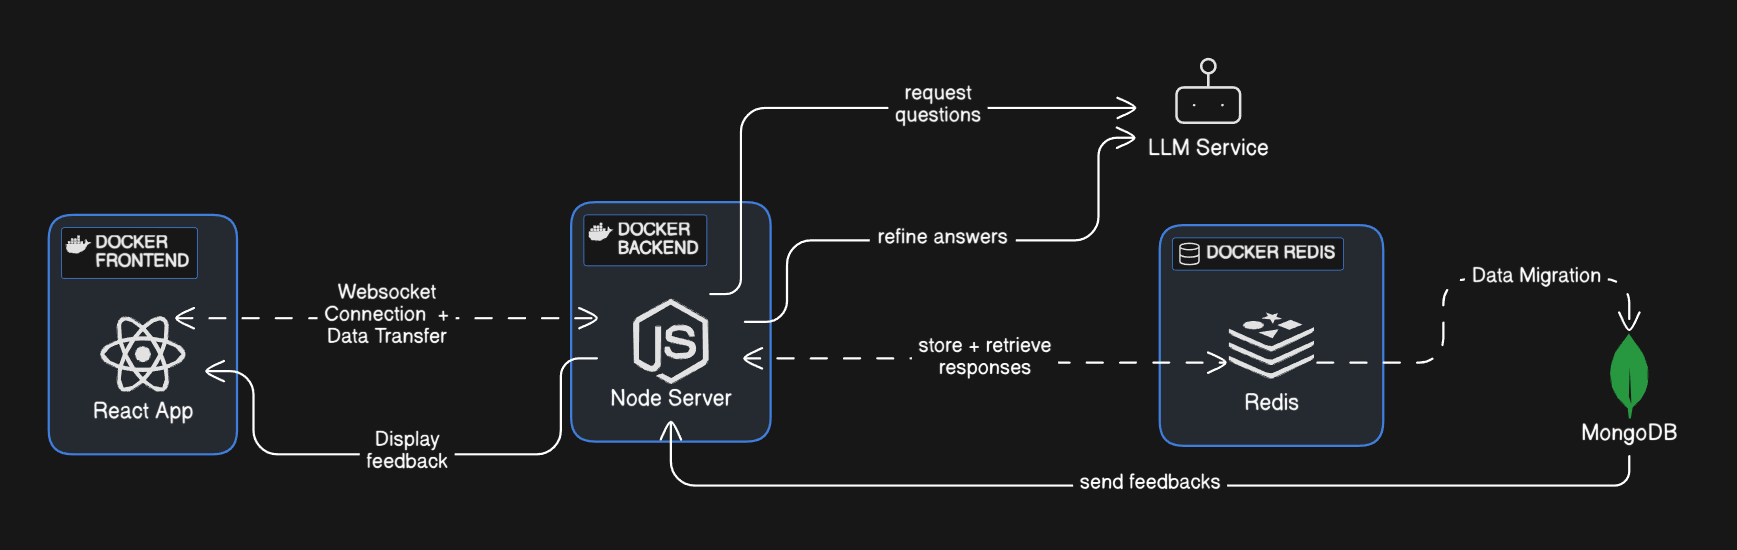
# Project Structure:
|-app
    |-Backend
        |- Dockerfile
        | - ....
	|- Frontend
		 |- Dockerfile
		 |- ....
    |- docker-comopse.yml
# Writing DockerFile:
-
Frontend:
We are using Vite + React +TS server for our frontend.
FROM node
WORKDIR /app
COPY package*.json ./
RUN yarn install
RUN yarn global add serve
COPY . .
RUN yarn build
EXPOSE 5173
CMD ["serve", "-s", "dist", "-l", "5173"]
- Creating image for running our react by pulling the
nodeimage from registry - Creating a work directory for our frontend as
/appinside container - copying our local
package.jsonfiles to the image - While creating a image, we run
yarn installto install all dependencies to run a container - Adding
serveor accessinghtmlfile after compiler - Exposing the container's port for accessing.
CMDis used when container is created and started.
--- Similarly for Backend
-
Backend:
We are using expressJS + TS for backend
FROM node
WORKDIR /app
COPY package*.json ./
RUN yarn install
COPY . .
COPY .env ./
EXPOSE 3000
CMD ["tsc" , "&&" , "node" , "dist/index.js"]
- Backend and frontend will be running in a separate containers so we need a
Docker Networkto make sure our data transfer happens, hence we usedocker-composeto make our life easy.
# Writing docker-compose file:
docker-compose.yml
version: '1.0'
services:
	redis:
		image: redis
		ports:
			- "6379:6379"
		healthcheck:
			test: ["CMD", "redis-cli", "ping"]
			interval: 10s
			timeout: 5s
			retries: 5
			start_period: 10s
		volumes:
			- redis-data:/data

	backend:
		build:
			context: ./backend
		ports:
			- "3000:3000"
		environment:
			FIREWORKS_API_KEY: fw_3hnQ
		env_file:
			- ./backend/.env
		healthcheck:
			test: ["CMD", "curl", "-f", "http://localhost:3000/"]
			interval: 10s
			timeout: 10s
			retries: 10
			start_period: 10s
		volumes:
			- ./backend:/app
			- /app/node_modules

	frontend:
		build: ./frontend
		ports:
			- "5173:5173"
		depends_on:
			backend:
				condition: service_healthy
		volumes:
			- ./frontend:/app
			- /app/node_modules

volumes:
	redis-data:
This is a Docker Compose file that defines a multi-container application with three services:
# Services
- Redis: Uses the official Redis image, maps port 6379, and sets up a health check.
- Backend: Builds a Docker image from the
./backenddirectory, maps port 3000, sets environment variables, and defines a health check. - Frontend: Builds a Docker image from the
./frontenddirectory, maps port 5173, and depends on the healthy state of the Backend service.
Volumes
The file also defines one named volumes:
- redis-data: Used by the Redis service to persist data.
# Setup AWS EC2 Instance:
- Select Free tier in Ec2 create instance.
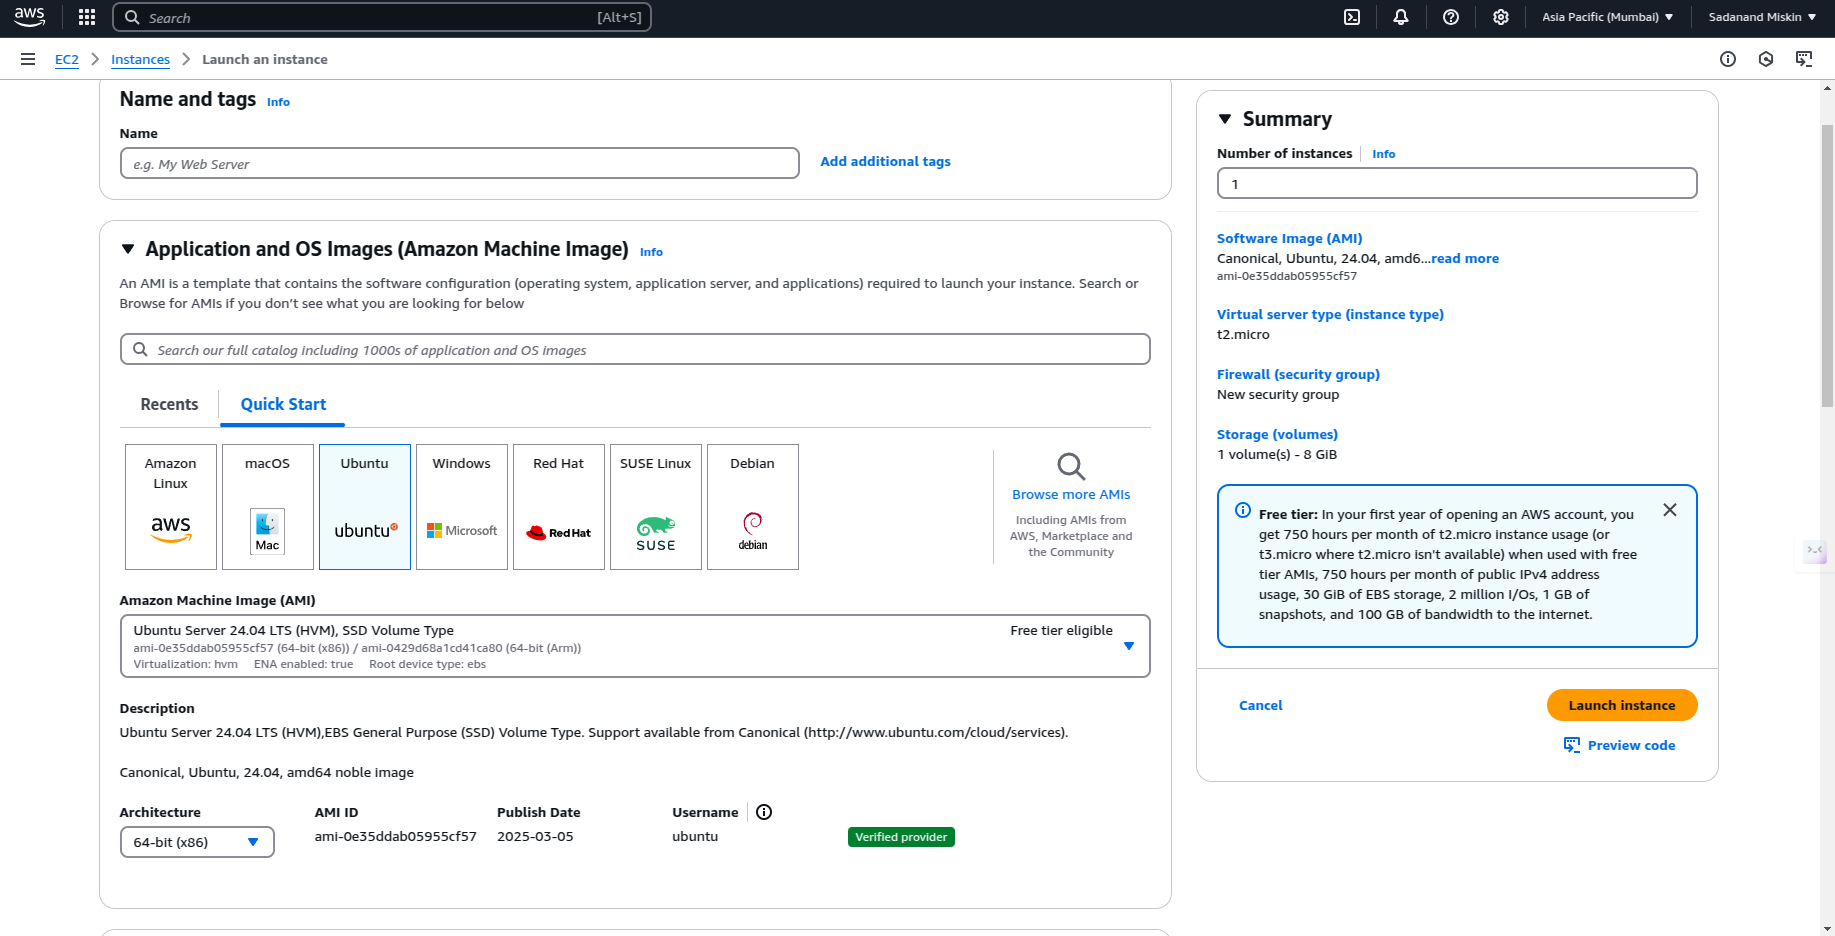
- Select your key-pair and create instance, Allow the traffic from internet.

Make changes in Frontend and Backend code for letting Application accessed throughout internet
Frontend:
- Make sure your app is bound to
0.0.0.0instead oflocalhostor127.0.0.1. In Vite ( it's:5173):
Update vite.config.ts :
import { defineConfig } from 'vite'
import react from '@vitejs/plugin-react'

export default defineConfig({
  plugins: [react()],
  server: {
    host: '0.0.0.0', // Listen on all network interfaces
    port: 5173,      // Ensure port is set
    strictPort: true // Prevent Vite from switching to another port
  }
})
Backend:
- Ensure your backend server is listening on all network interfaces (
0.0.0.0) instead oflocalhost:
update server.ts
app.listen(3000, '0.0.0.0', () => {
  console.log('Server running on port 3000');
});
- Now compress you /app to
tar.gzso that you can run in Instance
tar -czvf archive.tar.gz directory_name
- Transfer compressed dir to your instance using
scp
scp -i "~/.ssh/you_pemfile.pem" -r ~/path_to_tar.tar.gz ubuntu@<instance_public_ipv4_dns_address>:~/
- Use SSH for accessing your Instance
ssh -i "~/.ssh/your_pemfile.pem" ubuntu@<instance_public_ipv4_dns_address>
- Decompress
tar.gz
tar -xzf folder.tar.gz -C /path/to/destination
- Install Docker
sudo apt-get install \
    ca-certificates \
    curl \
    gnupg \
    lsb-release
sudo mkdir -p /etc/apt/keyrings
curl -fsSL https://download.docker.com/linux/ubuntu/gpg | sudo gpg --dearmor -o /etc/apt/keyrings/docker.gpg
echo \
  "deb [arch=$(dpkg --print-architecture) signed-by=/etc/apt/keyrings/docker.gpg] https://download.docker.com/linux/ubuntu \
  $(lsb_release -cs) stable" | sudo tee /etc/apt/sources.list.d/docker.list > /dev/null
sudo apt-get update
sudo apt-get install docker-ce docker-ce-cli containerd.io docker-buildx-plugin docker-compose-plugin
- Start docker for running applications
docker-compose up
- You start containers individually:
docker-compose up --frontend
docker-compose up --backend
- When you do
docker psand check all containers are runnnig:

Suppose your instance Public IP address is 3.11.1.3 accessible on internet via:
- 3.11.1.3:3000 -> Backend server
- 3.11.1.3:5173 -> Frontend server
But you want to use in yourdomain.com, How do you do?
# Setting up the Reverse Proxy using a Domain:
Set Up DNS Records:
- Go to your domain registrar (e.g., GoDaddy, Namecheap) and follow these steps:
-
For the Frontend (Vite):
- Type:
A - Name:
app(forapp.yourdomain.com) - Value: Your EC2 public IP (eg: 3.11.1.3)
- TTL:
600
- Type:
-
For the Backend (Node.js):
- Type:
A - Name:
api(forapi.yourdomain.com) - Value: Your EC2 public IP (eg: 3.11.1.3)
- TTL:
600
- Type:
-
SSH into your instance:
Caddy is a reverse proxy like Nginx, more easy to setup
- Install
Caddyin your instance:
sudo apt update
sudo apt install -y debian-keyring debian-archive-keyring apt-transport-https
curl -1sLf 'https://dl.cloudsmith.io/public/caddy/stable/gpg.key' | sudo gpg --dearmor -o /usr/share/keyrings/caddy-stable-archive-keyring.gpg
curl -1sLf 'https://dl.cloudsmith.io/public/caddy/stable/deb.deb.txt' | sudo tee /etc/apt/sources.list.d/caddy-stable.list
sudo apt update
sudo apt install caddy
- Open
Caddyfileusing text editor
sudo nano /etc/caddy/Caddyfile
- edit
CaddyFile:
app.yourdomain.com {
  # Serve Frontend
  reverse_proxy localhost:5173
}

api.yourdomain.com {
  # Serve Backend
  reverse_proxy localhost:3000
}
- Save file and restart
Caddy/ check status:
sudo systemctl restart caddy
sudo systemctl status caddy
# If you are on a IPV6 only network:
- You don't get a public IPv4 address.
- Docker's default IPv4 NAT won't work.
- Services like Google OAuth, package managers, and API endpoints may fail inside containers.
Enabling IPv6 in Docker ensures that your containers can communicate with the outside world, even in an IPv6-only environment.
- Ensure
/etc/docker/deamon.jsonfile is proper:
	{
	  "ipv6": true,
	  "fixed-cidr-v6": "2001:db8:1::/64"
	}
- Docker Compose file has 2 important things:
	networks:
		<app_network>:
			enable_ipv6: true
- (Optional)
	networks:
		<your_app_network>:
			driver: bridge
After deploying your Docker setup, connect to a container and test internet access:
docker exec -it <your_container_name> sh
This Configuration ensures internet inside docker container
Hurray, The application is accessible around the internet and containerized.