Practical Git: Commands Every Developer Should Know
Every basic thing about git with practical usage
Table of Contents
- What is git?
- Setting up the local git
- Git Init
- Adding files to the staging area
- Remove file from staging area (Undo It)
- Status of the current commit
- Commit
- Git Log
- Git reset
- Git Revert
- Branches
- Git conflicts
- Git cherry-pick
- Connecting Local Repo to Remote Repo
- Git Cloning
- Git Fetch and Pull
- Git Stash
- .gitignore
What is git
- Git is a distributed version control system that tracks versions of files. It is often used to control source code by programmers who are developing software collaboratively.
Setting up the local git
git config --global user.name "Your Name"
git config --global user.email "youremail@mail.com"
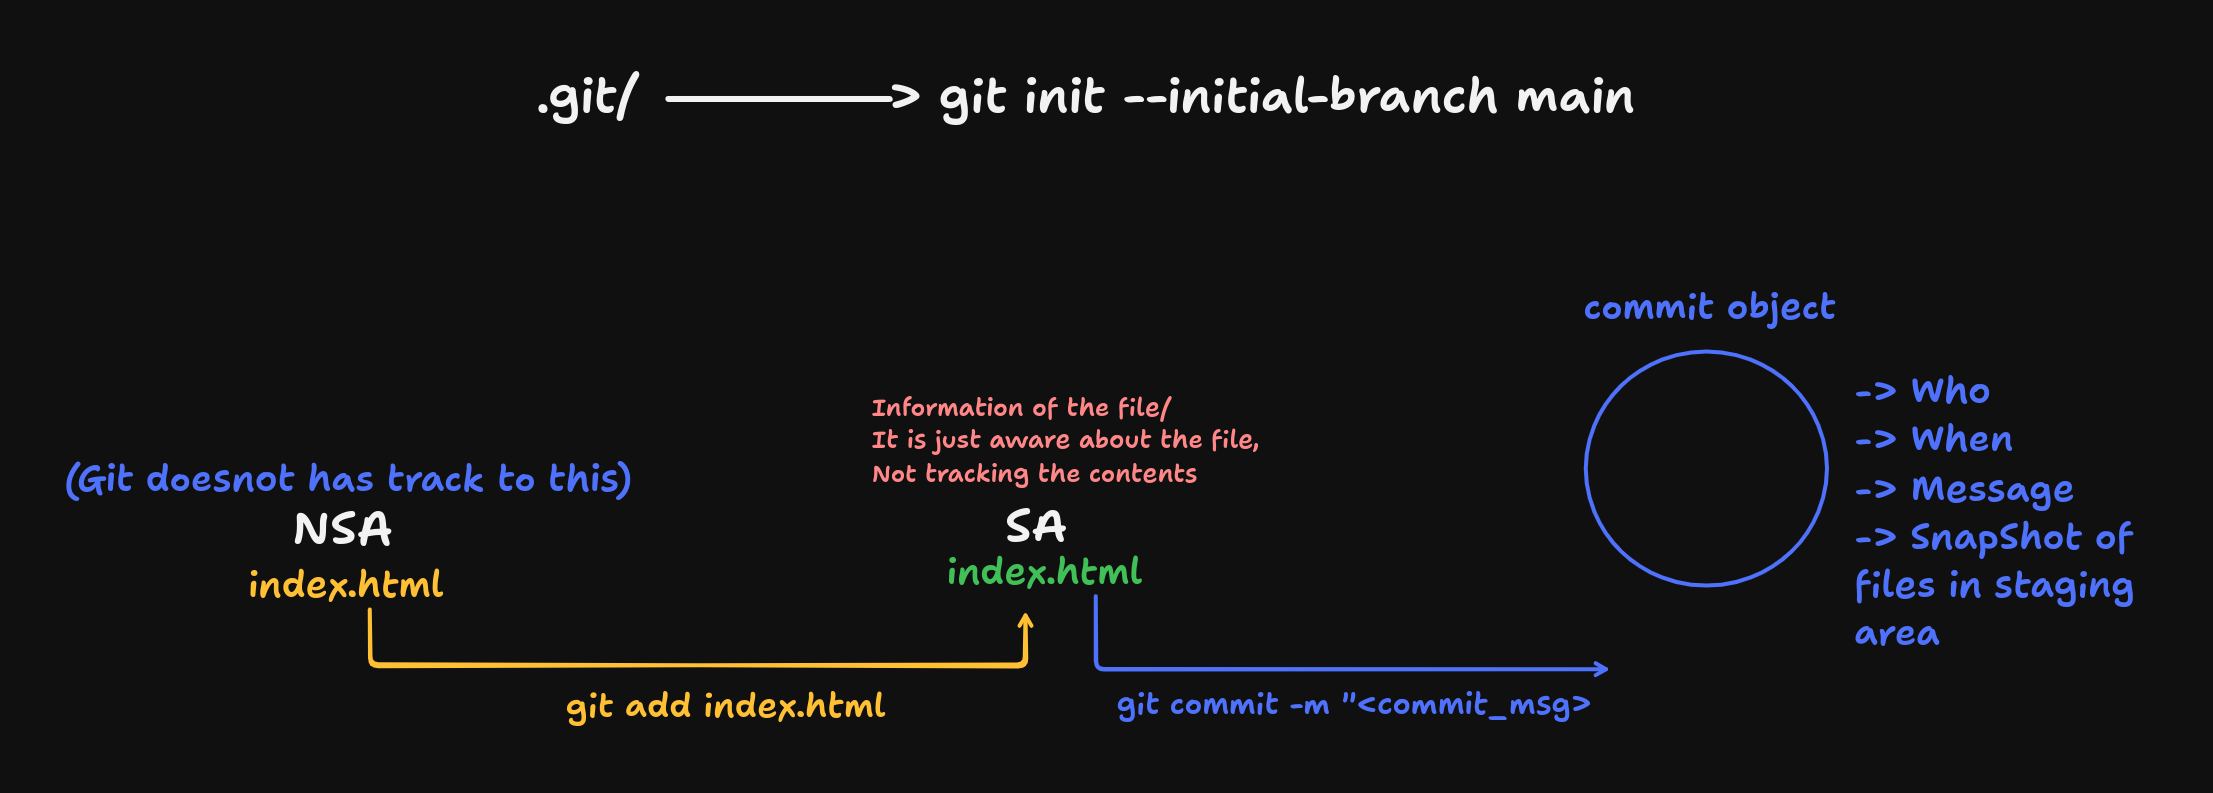
Git Init:
git init
# or
git init --inital-branch <branch_name>
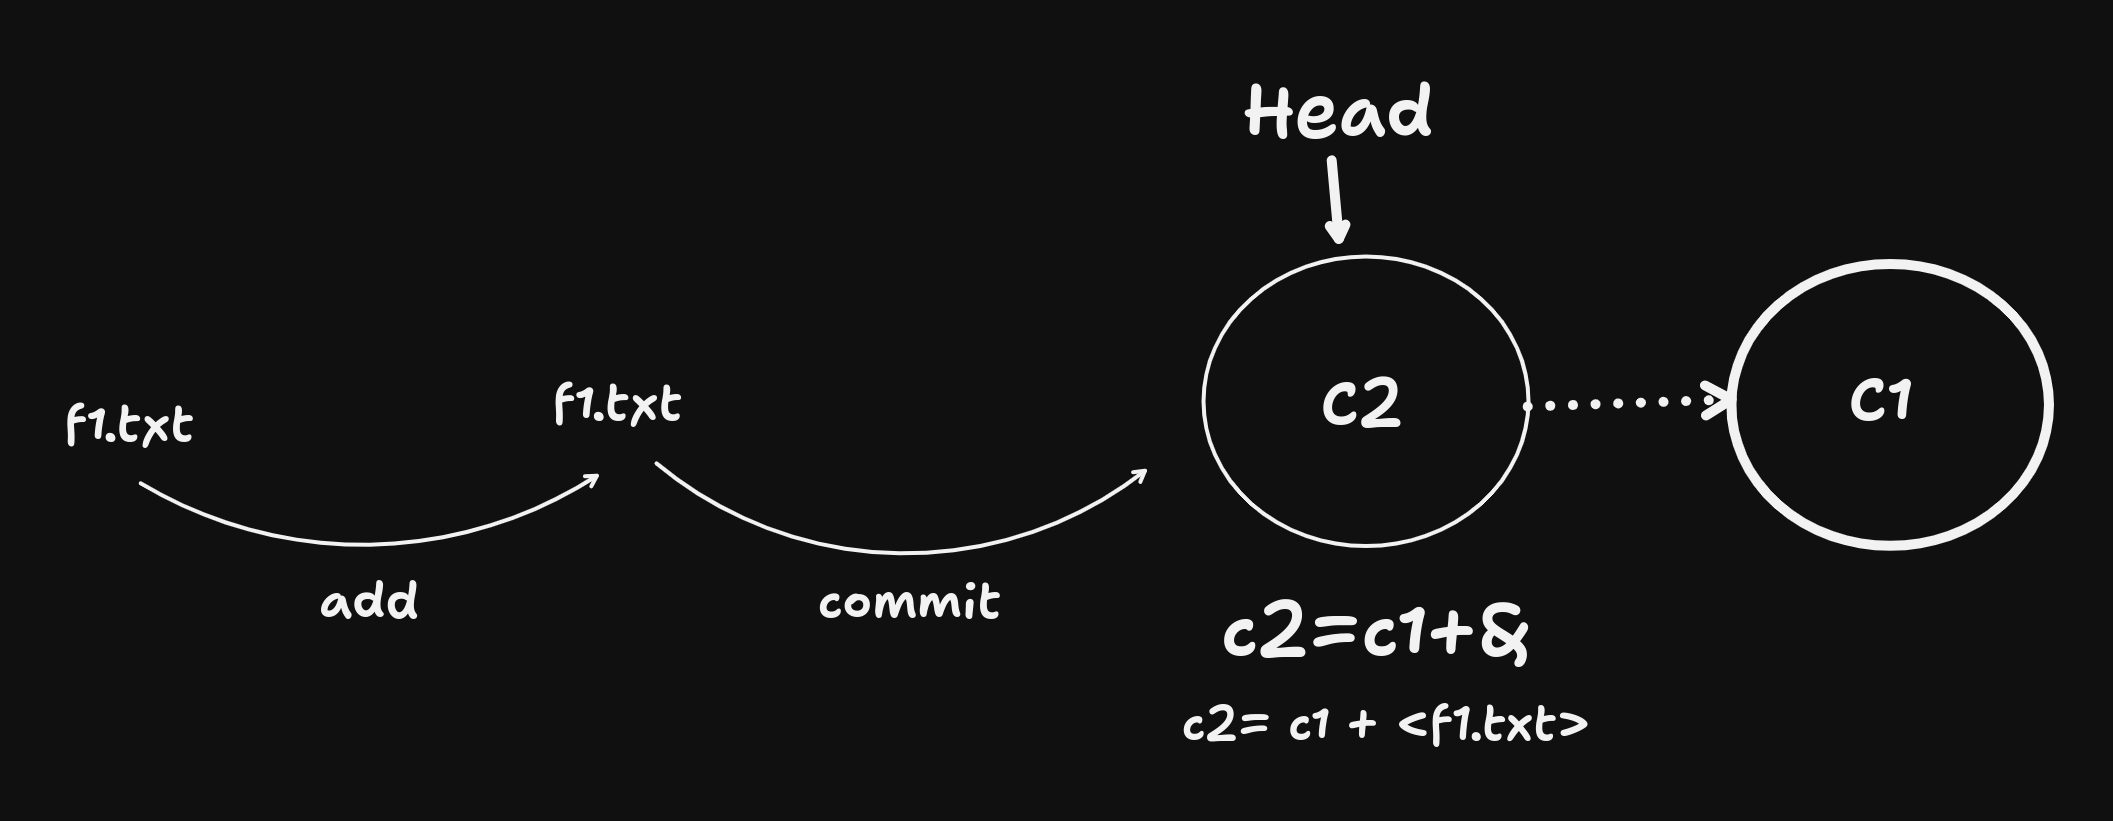
Adding files to the staging area
git add .
#####
git add <file_name>
Remove file from staging area (Undo It)
git rm --cached <file_name1> <file_name2> #... other files
- To remove the .git folder
rm -rf .git
Status of the current commit:
git status
Git does not track empty folders, only if some files are present
- Verbose (detailed info)
git status -v # detailed
# or
git status -s # short
Commit
git commit -m "<message>"
Now git is tracking the files which are committed, means which were in staging area before commit command.
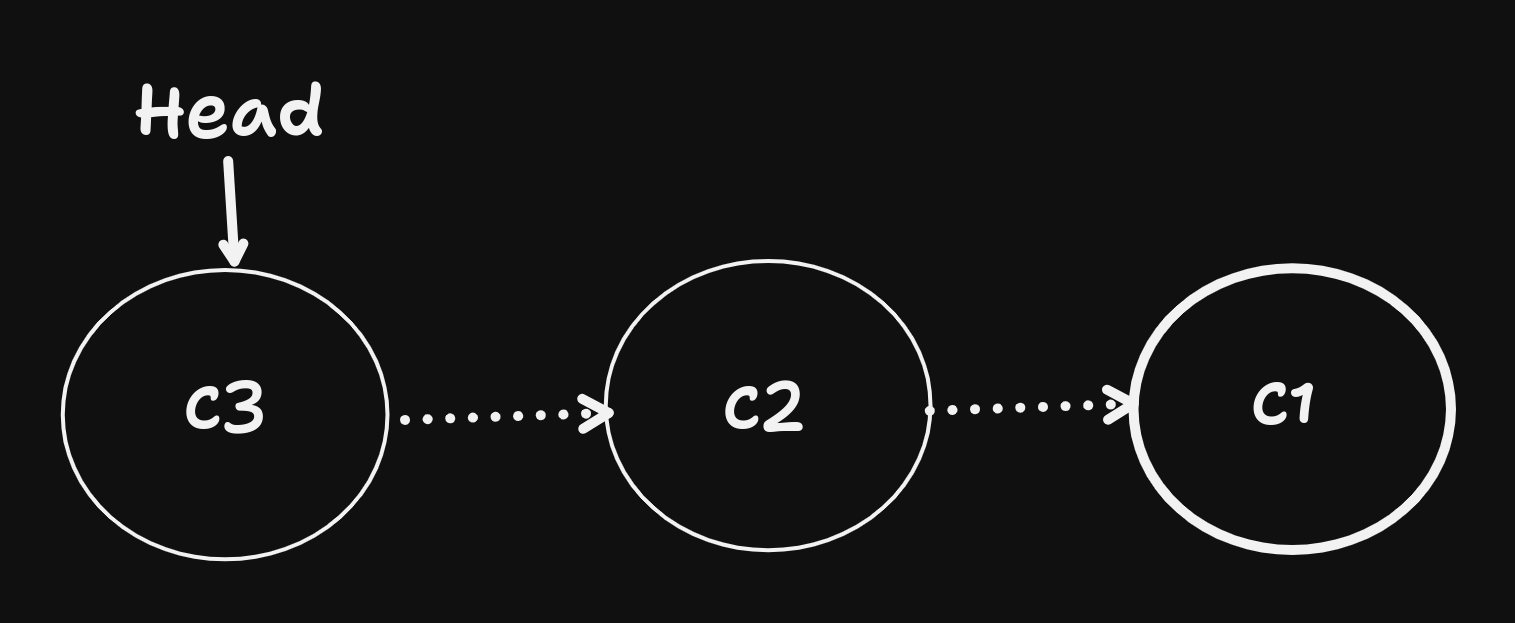
Head:
-> Points to the latest commit on the branch -> We can always change the position of the head.
If you had made changes in the tracked file only then you don't need to add first in staging area by using
addandcommitseparate commands.
git commit -a -m "<commit_message>"
Modifying the existing commit
--> If you have already last commit present and you want to make changes in file of that commit but not creating a new commit, (To modify a existing commit)
# add to staging area
git add <file_name>

#modify the existing commit
git commit --amend  # prompts to update the commit message
# or
git commit --amend --no-edit # uses the existing commit message but does the same work as above
- Adding a signature to the commit
git commit -s -m "<msg>"
- Results as:
git log
""
commit 2dafvrrd59e2251xzfaee473e38 (HEAD -> master)
Author: User <user@gmail.com>
Date:   Sat Jul 19 20:34:47 2025 +0530

    <msg>

    Signed-off-by: Sadanand Miskin <user@gmail.com>
""
Can you create an empty commit? -> Yes.
git commit --allow-empty -m "<message>"
Why do you need a empty commit?
If ever I want to test my CI pipeline over Jenkins etc. .Without creating a new commit or modifying one just creating an empty commit to trigger and test my CI pipeline.
Git Log
- Get the list of commits
git log
- Get only number of commits
git log -n 2 # top 2 commmits
- Get short version of logs
git log --pretty=short
# or
# --pretty=full ,for full
# --pretty=online
- Other method to log (Not much needed)
git log --pretty=format:"%h %n %an %ae"
# hash , message , author-name (you can use any one also)
- To know what changes happened in each commit
git log -p
""
commit 0c26b65f9b4ede5957ddc09303d78b41c21d3b4f
Author: Sadanand Miskin <user@gmail.com>
Date:   Sat Jul 19 20:32:18 2025 +0530

    created a.txt again

diff --git a/a.txt b/a.txt
index e69de29..ced8e84 100644
--- a/a.txt
+++ b/a.txt
@@ -0,0 +1 @@
""
How to display commits of last one week?
git log --since="1 week ago"
# yesterday, 1 month ago, 1 hour ago
From this-day to that-day?
git log --since="2024-05-06" --until="2025-05-01"
By a User:
git log --author="<author_name>"
Grep inside git
git log --grep="<to_find_string>"
Git reset
git resetprovides us options:- Unstage the file changes
- Undo the commit
- Discard/Delete the commit
There are 3 methods in
get reset:
- soft
- mixed
- hard
- Suppose I have 3 commits with file changes and I want to change the recent commit
Soft: When using
softthe changes are moved back to staging area.
git reset --soft <C2_commit_id>
git diff --staged
""
diff --git a/a.txt b/a.txt
index ced8e84..1a51ebe 100644
--- a/a.txt
+++ b/a.txt
@@ -1 +1,2 @@
 hello from
+you know what
""
Mixed: It will bring back to Non staging area.
git reset --mixed <c2_commit_id>
Hard: The changes you made in C3 will be discarded and deleted and head points to C2
git reset --hard <c2_commit_id>
Git Revert
-
The difference in
git revertandgit resetis that:git reset: It modifies the current commit and there is no backup to a commit.git revert: If you want to undo any commit, then it creates a new commit object without modifying the current (Not loosing the data).
-
with example:
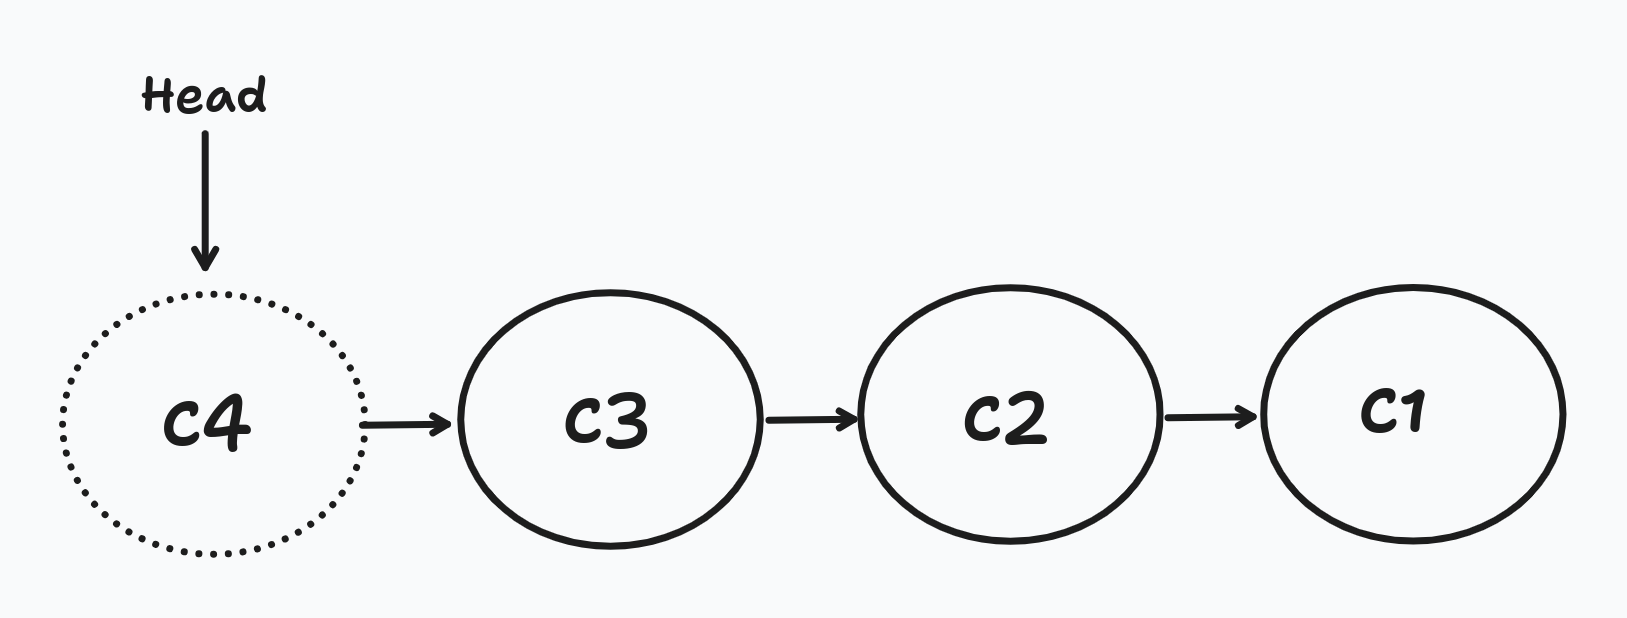
git revert c3
# creates a new commit object as c4
git checkout <commit_id>
# You can place head to any commit
Note:
git resetis a powerful command, when used may affect all who has the access to the branch as it modifies and undo the commit which leads to loosing of data. Hencegit revertis used to create a backup of the data
Use git revert if you want to keep your commit changes stagnant.
Branches
Branches are always associated with commit not when
git init, default as master.
- Create a branch
git branch <new_branch>
You can create a new branch from where the
headis pointing inmasterbranch
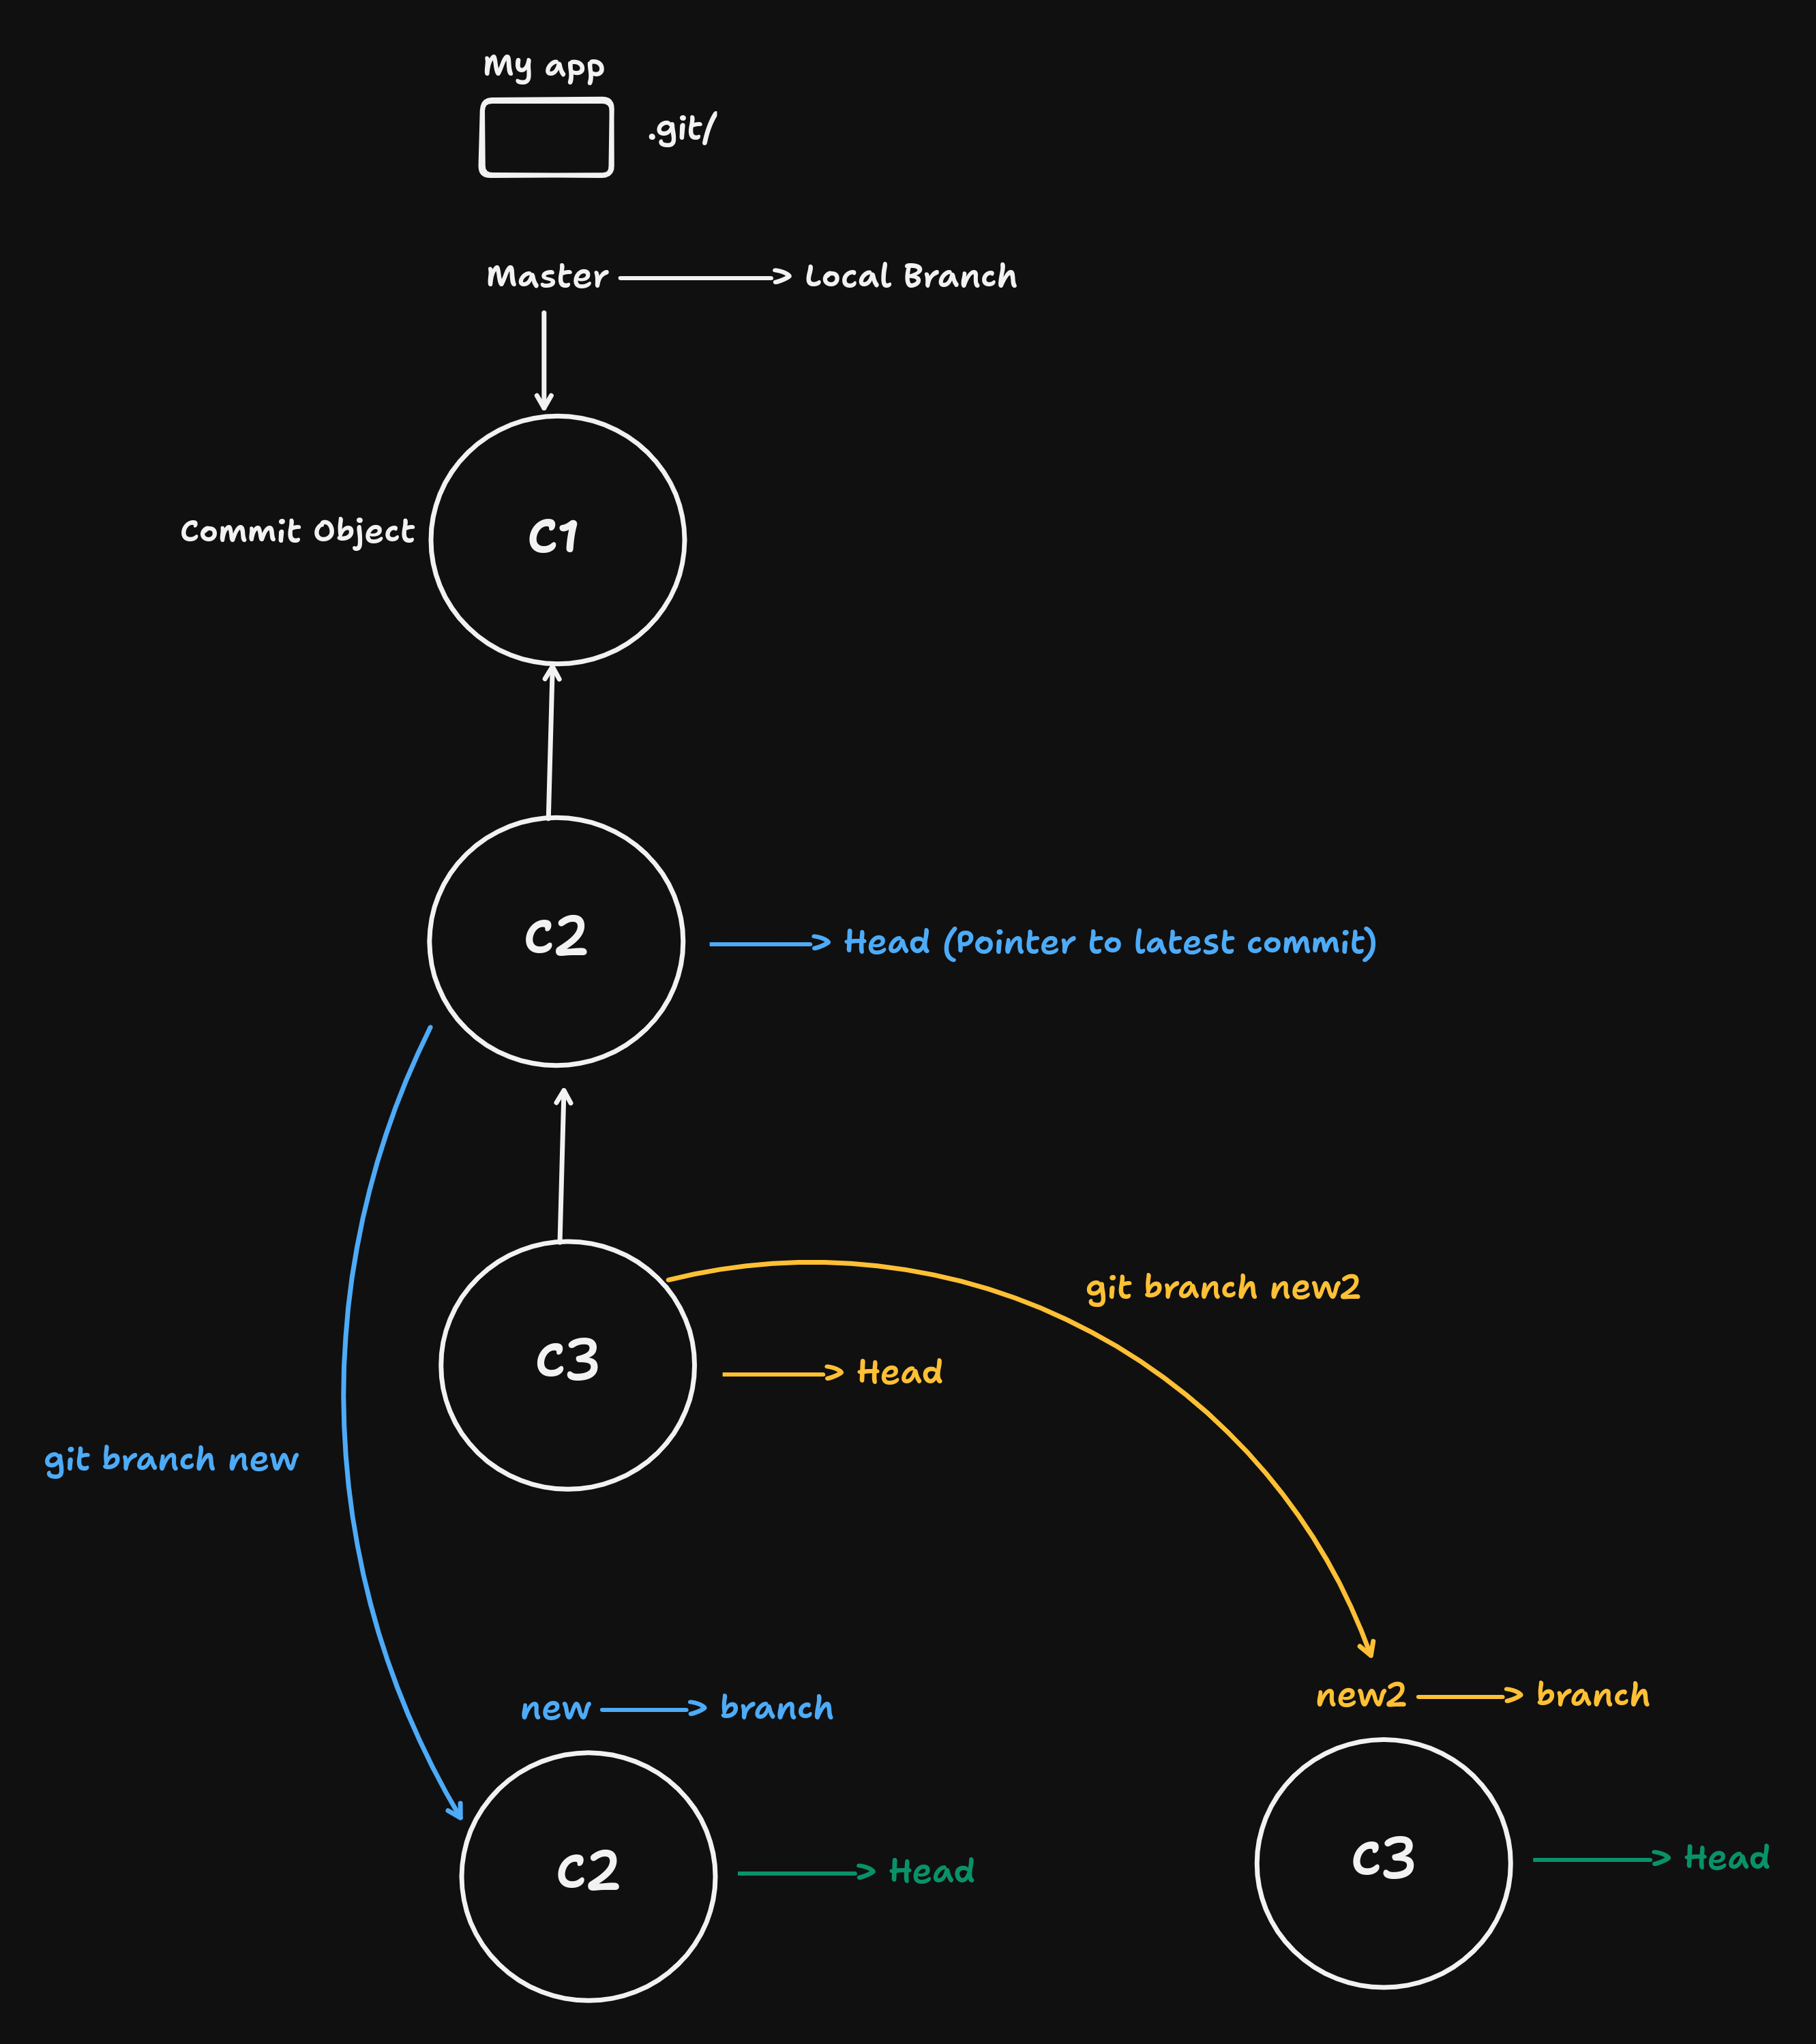
-
As you can see here the
newbranch is one commit behind themasterbranch ormasteris one commit ahead. -
where as
new2branch is in sync with themaster. -
Checking out to other branch
git checkout <new_branch_name>
or use:
git switch <branchname>
Branches provides us isolation to work independently without worrying about affecting to the master branch.
From which branch you created a new branch that branch will be taken as reference
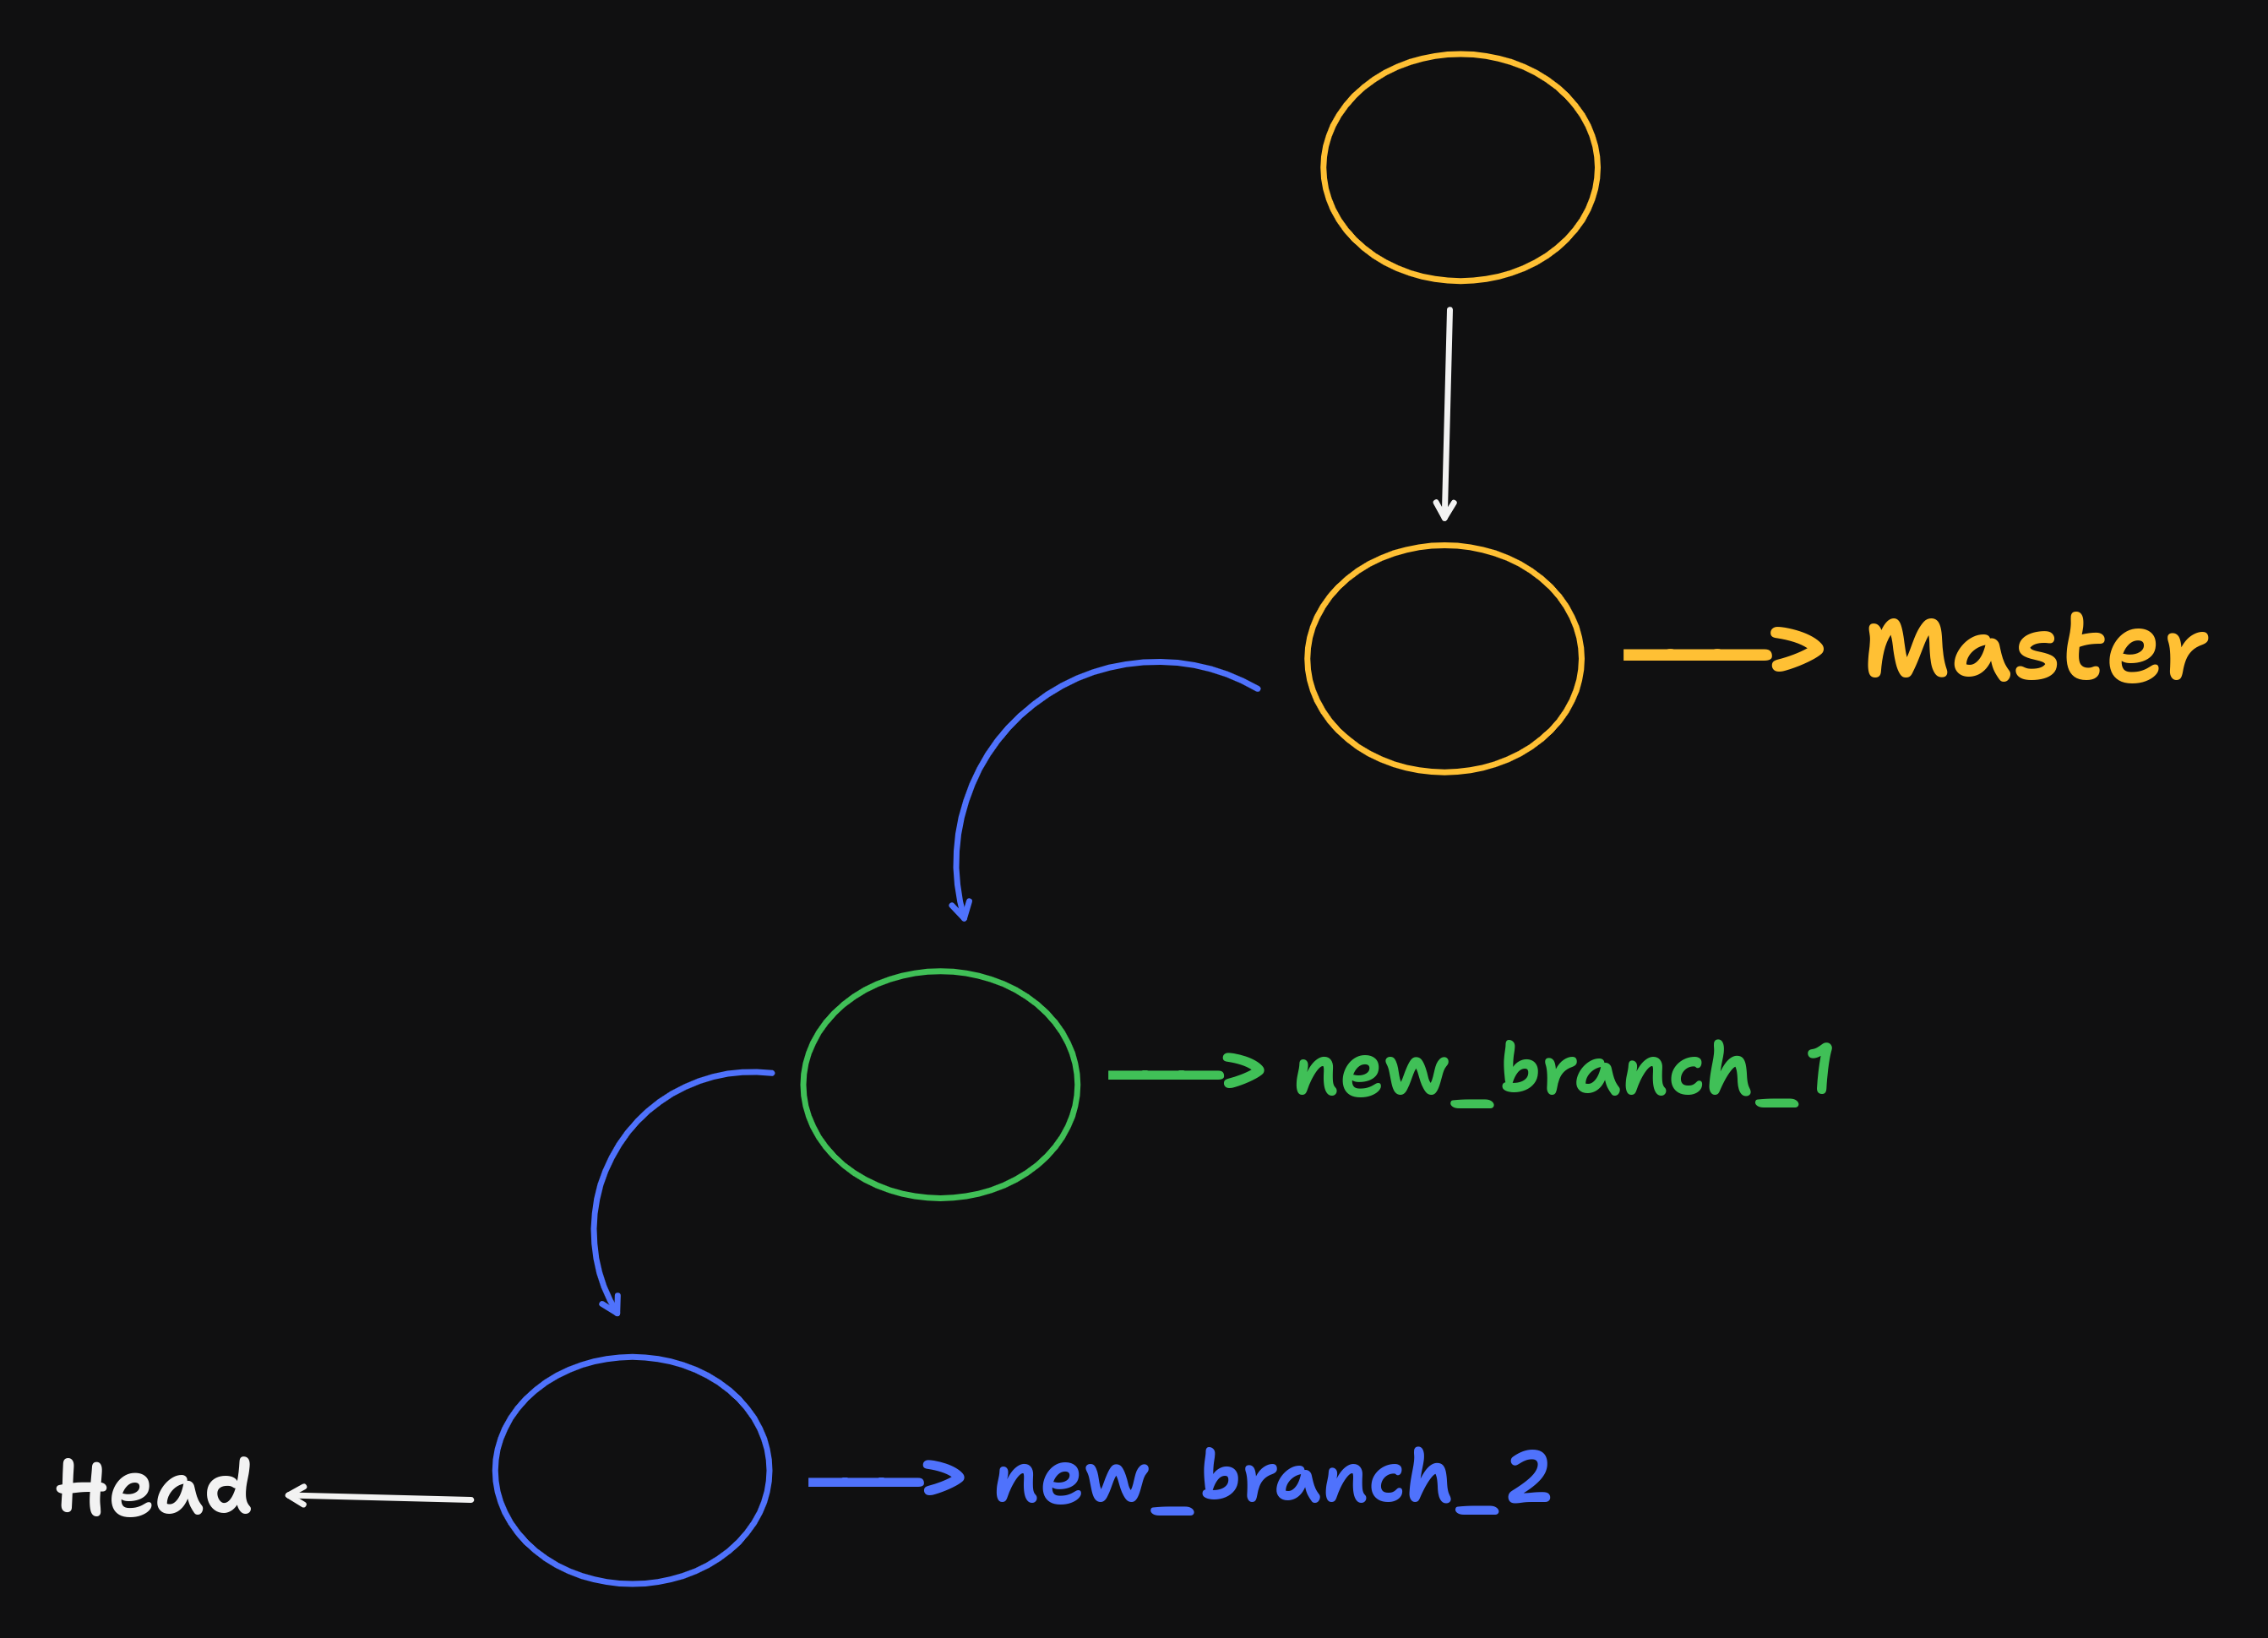
-
Here
new_branch_2is head but created from reference ofnew_branch_1and it is 2 commits ahead of master branch. -
Deleting a branch:
git branch -d <branch_name>
Merging a branch:
git checkout master
`
git merge new_branch_2
- Now both master and new_branch_2 are in sync.
- To merge any branch to the master branch, first we need to be in master branch
git switch master
- Then use merge command, Whatever the commit is in the Feature branch that will be added to master branch
git merge Feature
Git Merging Scenario - 2
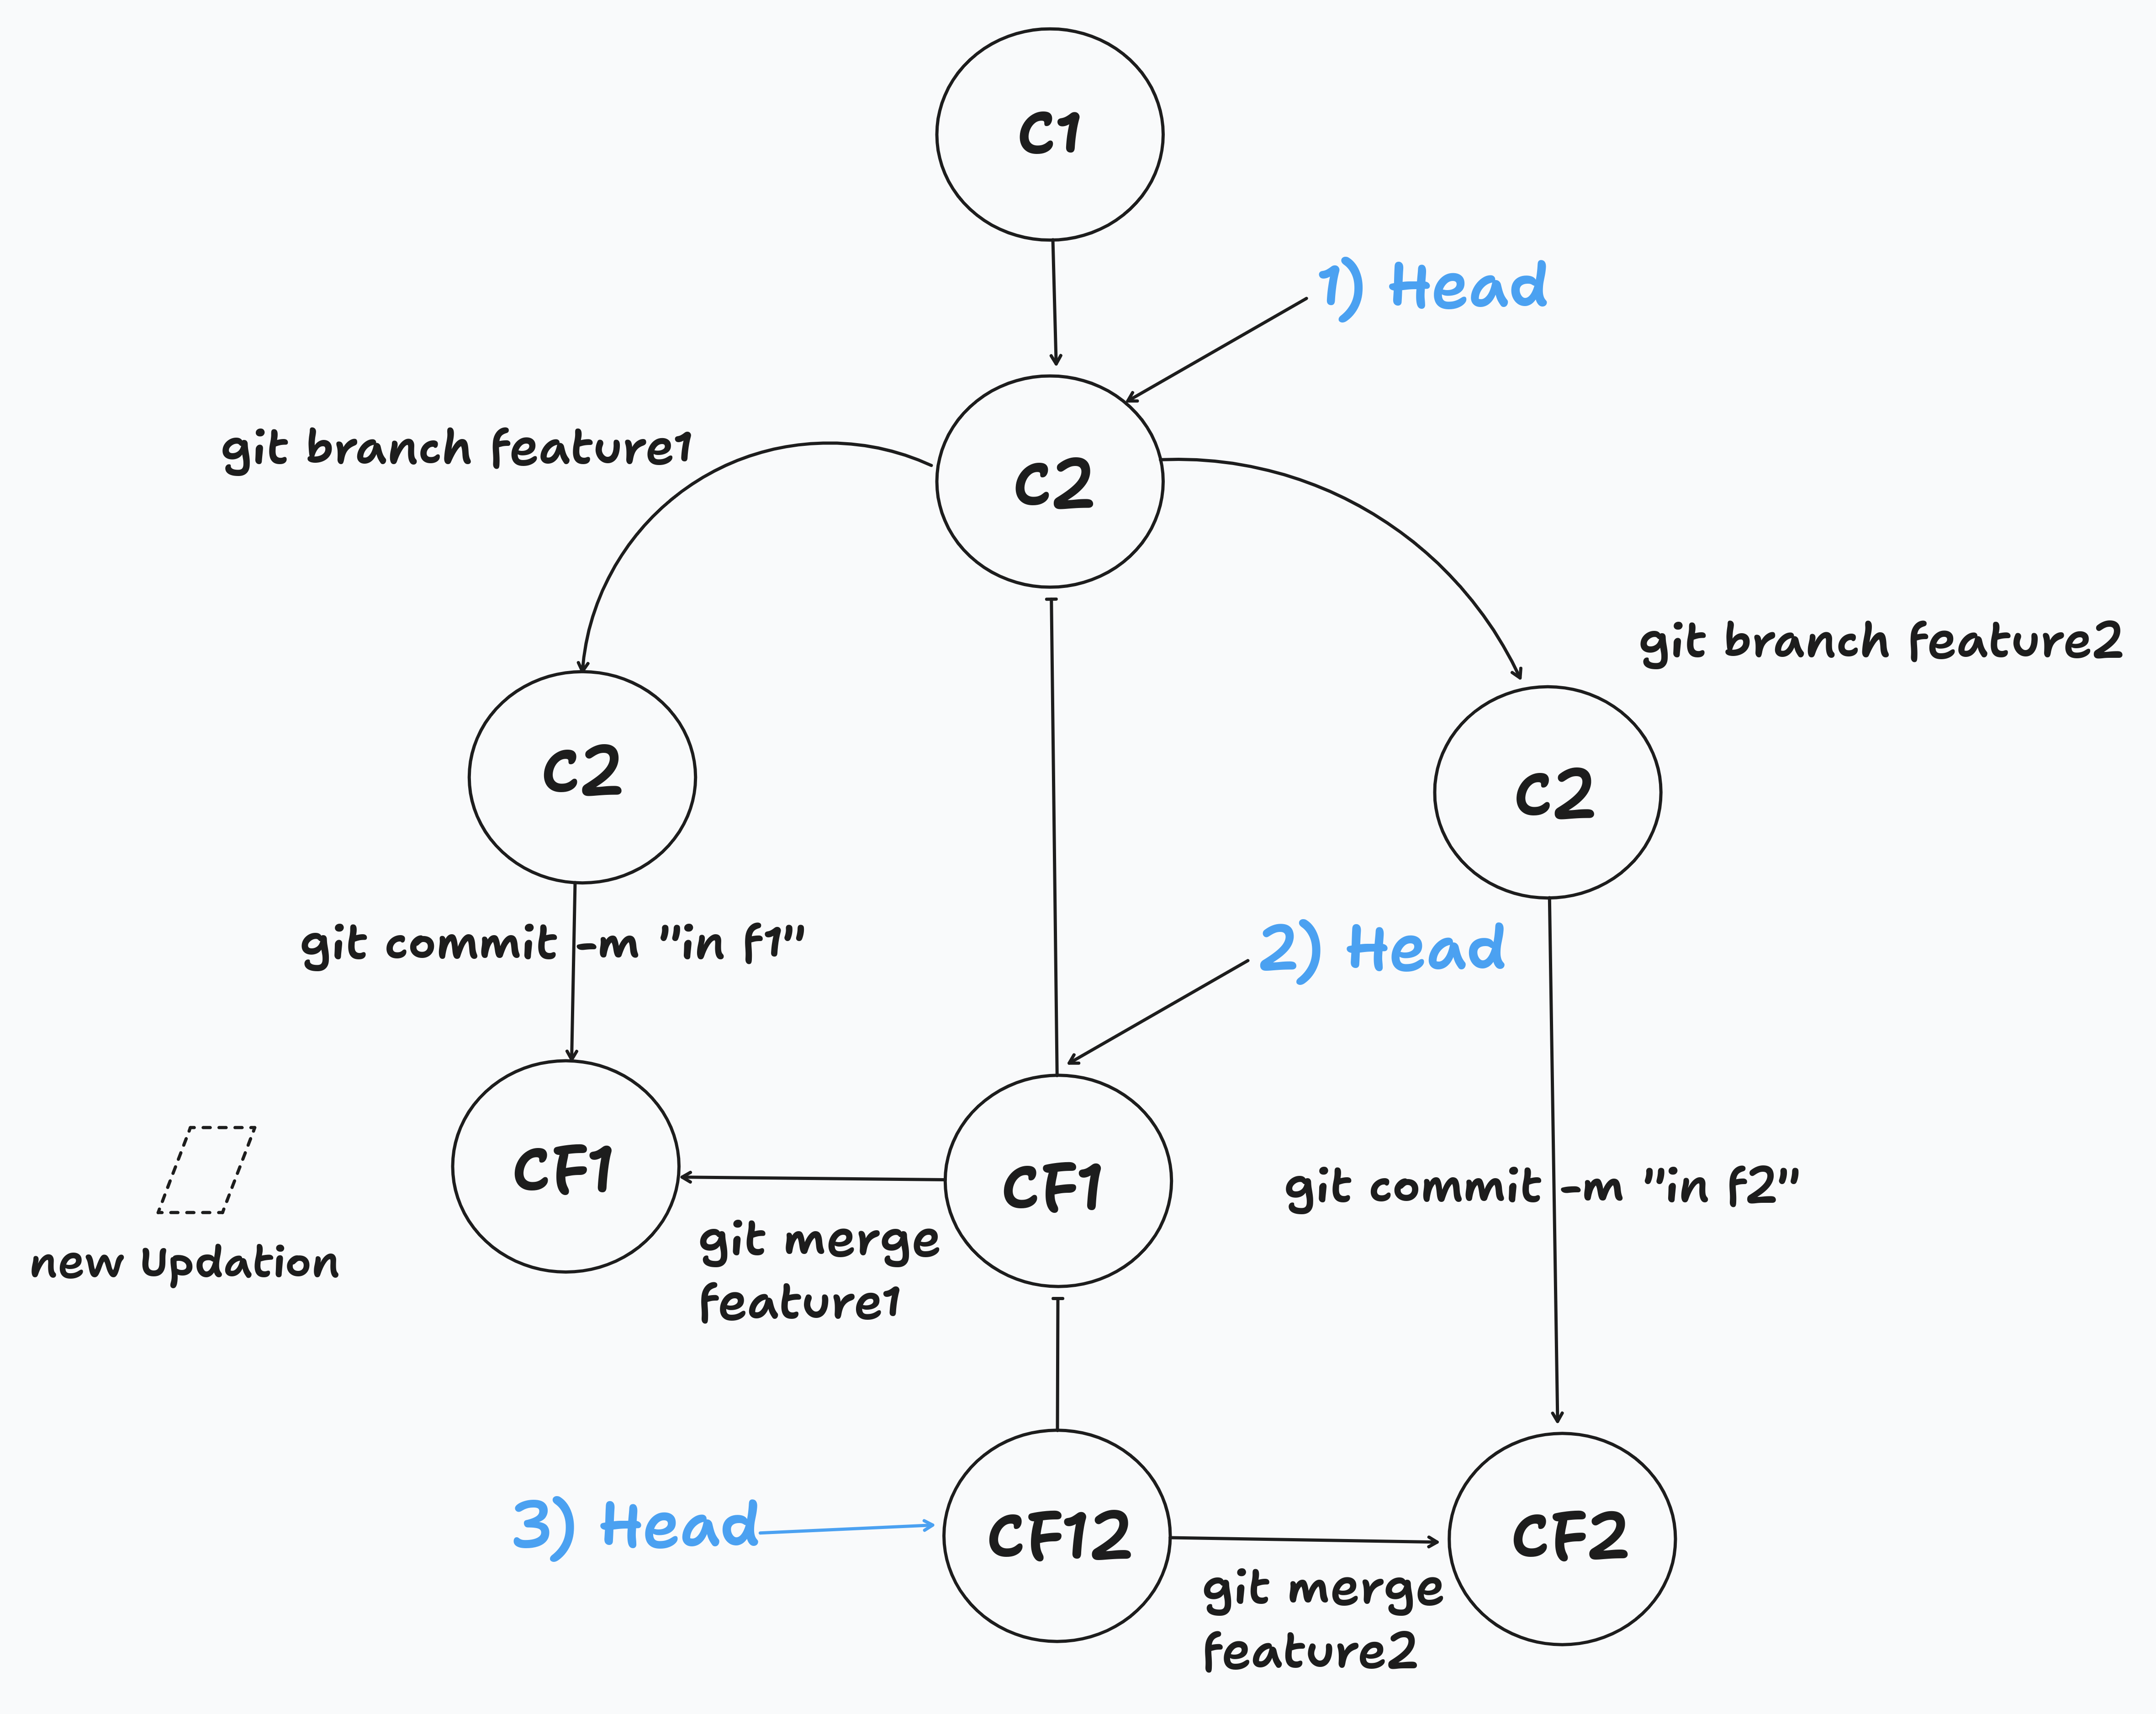
• Initial Setup: Start with main branch at commit C1, then C2 becomes the HEAD
• Feature Branch Creation:
git branch feature1creates a new branch from C2git branch feature2creates another branch from C2
• Independent Development:
- Feature1 branch: Add commit CF1 with message "in f1"
- Feature2 branch: Add commit CF2 with message "in f2"
• Merging Process:
- Step 1:
git merge feature1- Merges feature1 into main, HEAD moves to CF1 - Step 2: HEAD moves to feature2 branch at CF2
- Step 3:
git merge feature2- Creates a new merge commit CF12 combining both features
• Final State:
- All features are integrated into main branch
- CF12 represents the merged state containing changes from both feature branches
- New updates can be added to the dashed box for future development
This demonstrates a typical feature branch workflow where multiple developers work on separate features before merging them back into the main branch.
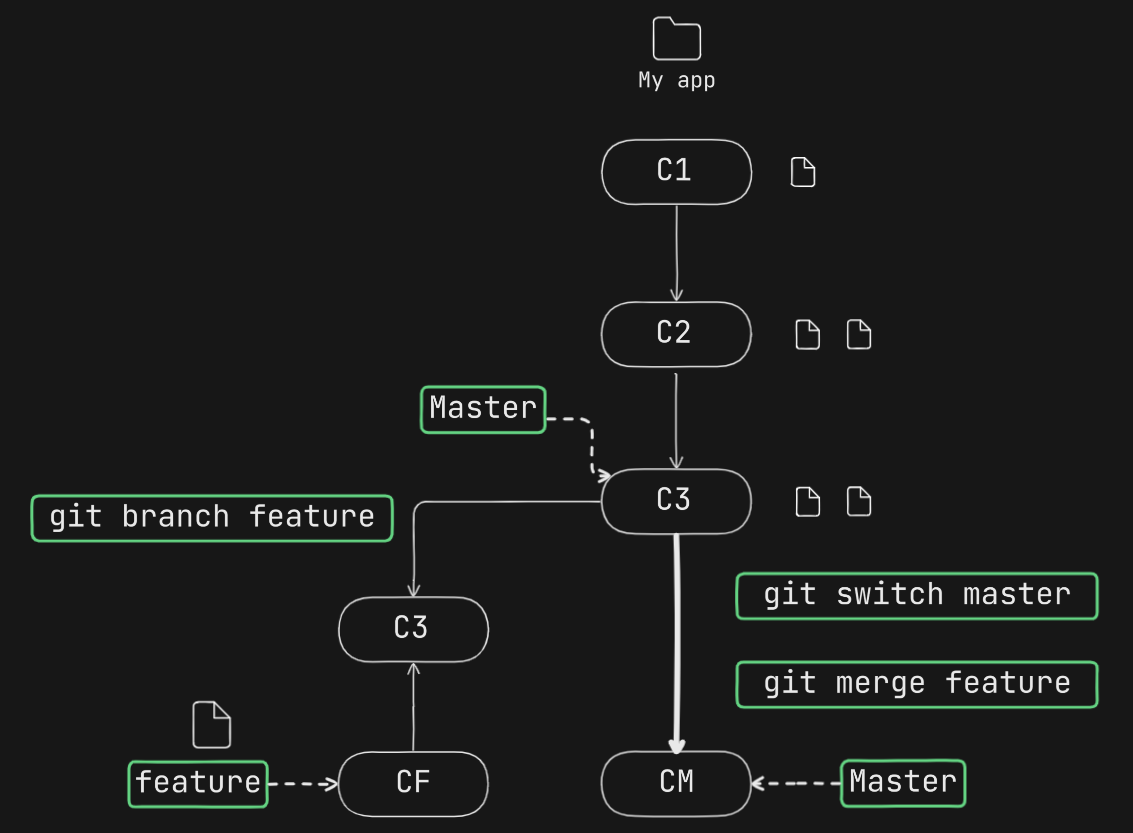
Git conflicts
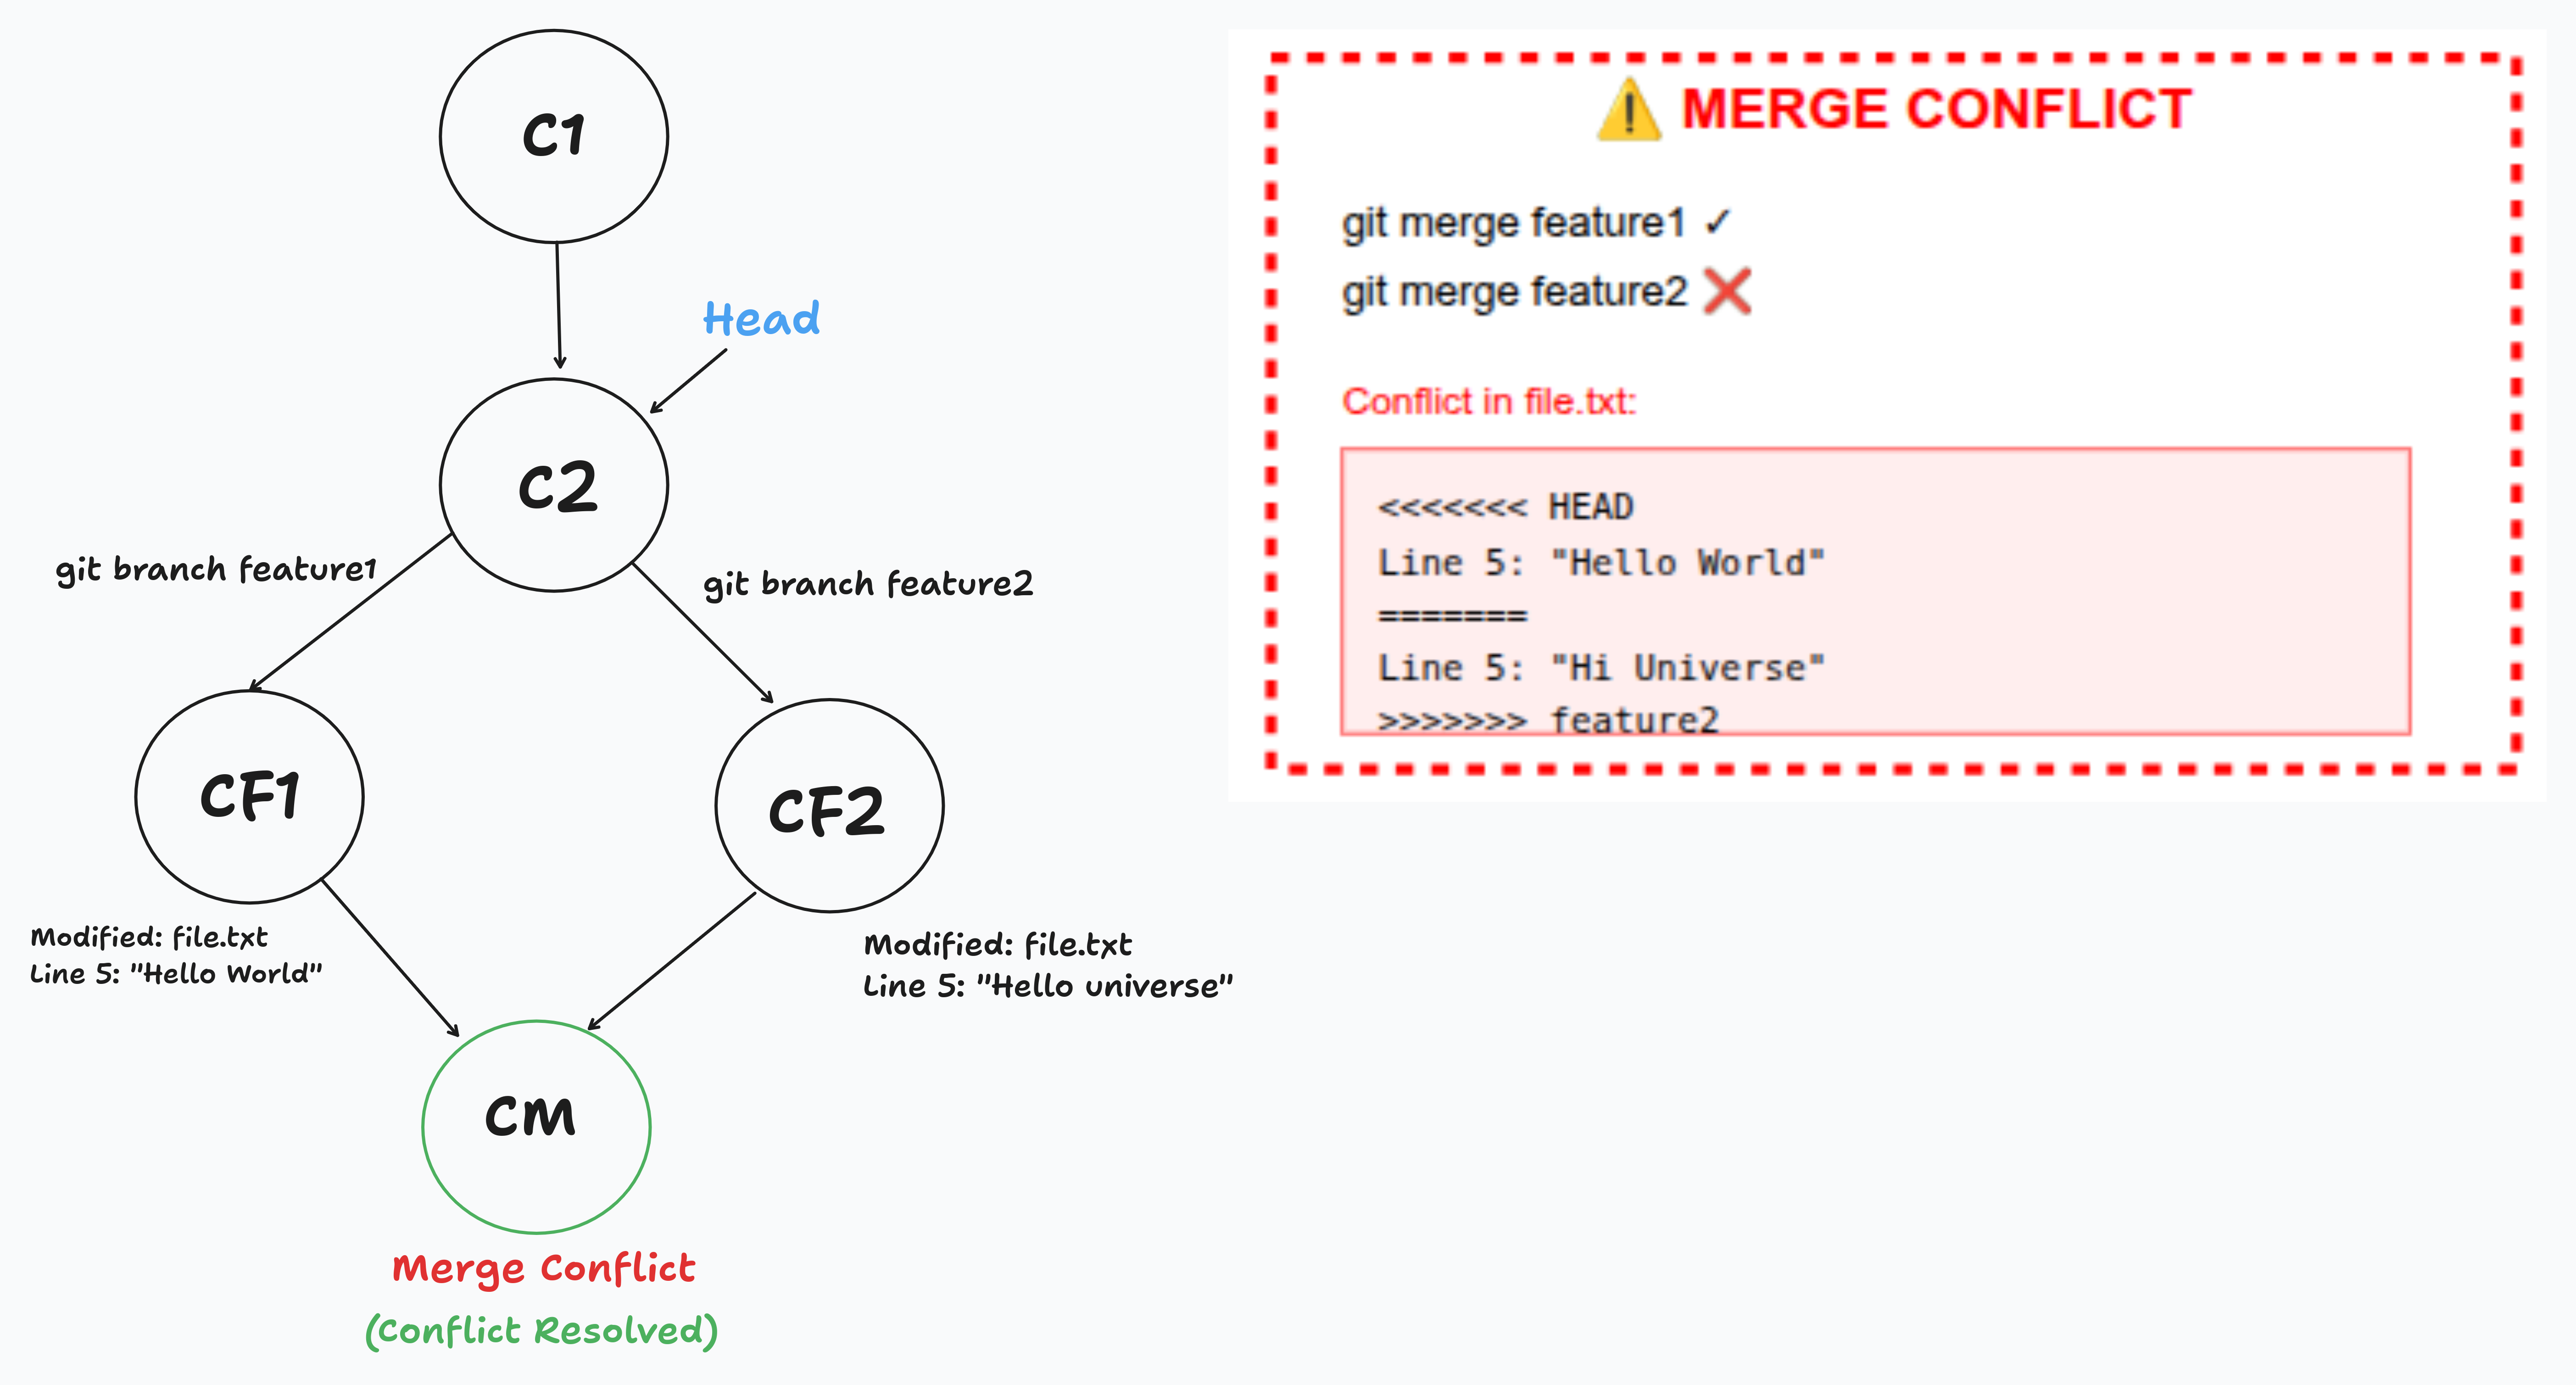
• Same Starting Point: Both feature1 and feature2 branches created from commit C2
• Conflicting Changes:
- Feature1 modifies
file.txtline 5:"Hello World" - Feature2 modifies
file.txtline 5:"Hi Universe" - Both branches change the same line in the same file
• First Merge Success: git merge feature1 works fine - no conflict yet
• Second Merge Conflict: git merge feature2 fails because:
- Git can't decide which version to keep
- Same line has different content from two sources
• Conflict Markers: Git adds conflict markers to the file:
<<<<<<< HEAD- Current branch content=======- Separator>>>>>>> feature2- Incoming branch content
• Resolution Process:
- Edit the file manually to choose/combine changes
- Remove conflict markers (
<<<<<<<,=======,>>>>>>>) - Stage the resolved file:
git add file.txt - Commit the resolution:
git commit -m "Resolve merge conflict"
• Final Result: Creates merge commit (CM) that successfully combines both branches with resolved conflicts
Conflicts occur when the same lines in the same files are modified differently in both branches being merged.
Git cherry-pick
Apart from using git merge we have another method to merge the other branches with master.
- check out to master branch:
git checkout master
- cherry-pick the commit id of a feature branch
git cherry-pick <any_feature_branch_commit_id_tobe_merged>
Thus a new commit object is created in master branch from feature branch
Difference in cherry-pick and merge:
- If suppose you are working on
featurebranch and you did4commits, but 3 commits are ready and the 4th one is not. - For a feature in your application, So you want to include the commit from 3rd commit into your
masterbranch, you can usecherry-pickand use 3rd commit Id from feature branch and use it in master. - But if you use
git mergeit will merge all the commits, simply the recent commit fromfeaturebranch intomaster. - But in this case the 4th commit from the feature branch is not ready to be used in master.
- Hence we need to use
git cherry-pick, Which we can use any commit id to be used in master.
Cherry-Picking is like to pick any commit from a branch and merge it with master. But 'Merging' is like taking all the commits from a branch and merging it with master where master has history to all the commits linked from that branch, but cherry-pick doesn't.
Best use of cherry-pick is when we have a feature commit ready and other is not, but it is required for updation.
Connecting Local Repo to Remote Repo
- Remote Repositories:
- GitHub
- GitLab
- BitBucket
In a new project folder
- Adding a connection with remote repo
git remote add origin <url>
- After that, init-add-commit in your master branch, then push it to remote repo
git push -u origin <branch>
After pushing you have a remote tracking branch created which tracks the remote repo and its contents - goes by
origin/<branch>
Revisiting git log
- This command just refers to the local
git branch
- For remote branches
git branch -r
Git Cloning
- Cloning a remote repository
git clone <repo_url.git>
- Get verbose about the remote
git remote -v
Git Fetch and Pull
- Lets say your project has
masterwhich is local branch andorigin/masterwhich is remote tracking branch after you pushed into remote repo.
Fetch
- It is used to download the changes from remote repository to your local repository
git fetch
#or
git fetch origin
Note: It will update only the remote tracking branches i.e
origin/masterbut not added tomaster
For syncing the changes in master branch we do,
git checkout master
# then
git merge origin/master
- To fetch changes of a certain branch which needed
git fetch origin <branch_name>
- If a project has multiple remote repositories like github, gitlab etc and to get all the changes of these in my local repo
git fetch --all
- Whichever remote tracking branches are deleted, it will remove from local also
git fetch --prune
Pull
git pullis nothing but the combination of 2 commandsgit fetchgit merge
git pull
Note: Use git pull only to the protected branches like 'master' , 'main'
You can pull from any remote branch to any local branch just by using
git checkout <local_branch>
# and
git pull origin <remote_branch>
using rebase (optional)
- For a cleaner branch history
git pull:
Before:
A---B---C (remote has commit C)
     \
      D (your local commit with new file)

After:
A---B---C (origin/main)
     \   \
      D---M (your main, M is merge commit)


>$ git pull --rebase

Before:
A---B---C (remote)
     \
      D (your local commit)

After:
A---B---C---D' (linear history, your commit moved on top)
Git Stash
If you have a file in a branch which is already been tracked by git and later you have modified the file and its in staging area, Later you want to move to another branch without committing the changes, then git throws an error like commit or stash the file as it will be overwritten.
Hence we use git stash to keep store of temporary changes in a space until commit.
- Use git stash when:
- when have modified changes and don't want to commit
- moving to other branch with those modified changes
git stash list
# stash@{0}: WIP on master: 75b3f1d ok
- Returning back and want to apply those changes
git stash apply <stash_id> # stash@{0}
- Clear stash list
git stash clear
.gitignore
Certain files and folders need not to be tracked, like node_modules .env
Credits: These git commands were compiled from the comprehensive tutorial by Tech with Jatin YouTube channel.